Final Fantasy III: Expanded Palettes Hack 

- ~
- Share
Final Fantasy III: Expanded Palettes Hack is a ROM hack for the Super Nintendo version of Final Fantasy III. This patch enhances the game's sprite palette limitations, allowing custom playable character sprites to utilize previously unusable colors. Targeted primarily at ROM hackers, it expands color options for character design, enabling greater creativity in sprite customization while keeping the original game's aesthetic.
This is a hack intended for those who are themselves creating ROM hacks. For those who are not themselves hacking the FF3/FF6 game, this patch will be of no interest. In fact, it will probably be difficult for non-ROM hackers to even understand what this patch does.
Specifically, this patch is intended for those who are creating or using new, custom sprites for new or altered playable characters. It allows the use of colors that, for strange technical reasons, were in the past not usable by any character who would participate in battle.
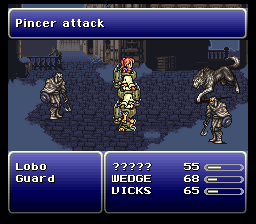
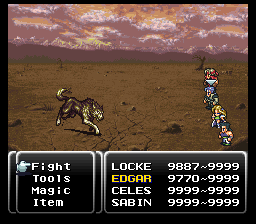
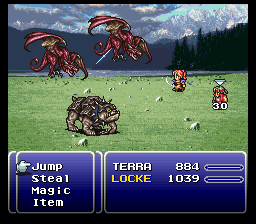
The included screen shots show the game's characters with altered colors. These characters are not using new or altered palettes. Each sprite is still using its original 16-color palette. However, these sprites are now using colors within that palette that previously were unusable. For instance, the pink color of Locke's shirt: in an unaltered ROM, if one tried to change Locke's clothing to this color by altering his sprite, his new sprite would not show up correctly in battle. It would show up with random, glitched colors. This patch allows these colors to show up correctly in battle, as pictured.
In essence, this patch expands the number of colors you can use for PCs, which gives you greater freedom in creating custom PC sprites.
Although this patch is easy to use in principle, the precise details of what it does and how it works are complicated, and are explained in greater detail in the readme file.
Two .ips files are included: for both the headered and unheadered 1.0 ROMs.
EXPANDED PC SPRITE COLORS FOR FF6
PATCH BY EGGERS
This readme file contains a lot of information, some of which is unnecessary
for most users. Read it if you are curious or want to do something advanced.
Make sure that you definitely read and understand the section "IMPORTANT USAGE
INFORMATION".
TABLE OF CONTENTS
1. What is this patch?
2. Permission
3. ROM versions / patch versions
4. Important usage information
4.1 PC sprites are still limited to 12 colors...
4.1.1 Certain palette colors are special...
4.2 Graphics glitches may occur when you load an older save...
4.3 Battle palettes can be different from out-of-battle...
4.3.1 There are other cases, not related to this patch...
5. If you're curious
5.1 Why can I only use 12 colors?
5.2 What is the cache, and why do I have to clear it...?
6. For advanced users
6.1 What bytes are altered?
6.2 Reassembling the code
1. WHAT IS THIS PATCH?
===================
A fact known probably only to ROM hackers: the FF6 / FF3us game only allows
playable character sprites to use the first 12 colors of a 16 color palette.
If the last four palette indices are used by a PC sprite, the sprite will look
correct on the world / town map, but will have mixed-up colors in battle.
This patch allows a PC sprite to use the last four, previously unusable colors
of its palette. If you are working on a hack which is to include custom PC
sprites, you now have a access to a greater selection of colors. (NOTE HOWEVER
the important restrictions and specification, discussed in the "usage
information" section.)
This hack is for people who are themselves creating hacks. In itself, has no
visible effect on the game. It will, however, allow the game to correctly
display your own custom sprites which use the formerly unusable palette
colors.
In order to help test or see this patch's effects, I have included a few
custom sprite sheets, as .png images. If you'd like to use these, you must
import them into the ROM yourself. I assume most people who have downloaded
this patch will already know how to do this using a tool like FF3usME. If not,
a good resource for tools and information is:
http://www.ff6hacking.com/
2. PERMISSION
===================
ROM hackers are encouraged to use this patch freely in creating their own
hacks. You may distribute a patch that effectively includes this patch as a
part of it, in addition to your own alterations like custom sprites. This
permission applies as long as you are not making money off your project.
In the appropriate credit section, please provide credit to Eggers.
I have also included my .asm code, which you may use and modify as you like.
Please provide credit to Eggers if you distribute this patch or code, with
or without modifications or additions.
3. ROM VERSIONS / PATCH VERSIONS
===================
I've included two versions of the .ips patch: one for a headered ROM, and one
for an unheadered. The unheadered ROM should be exactly 24 Mb in size, and the
headered one should have an extra 512 bytes ($200 in hexadecimal), containing
information that identifies the game to an emulator. Make sure you apply the
correct patch depending on whether your file has a header or not.
In addition, there are two versions of the FF3us game: a 1.0, and a 1.1. Both
ROM versions can be found online, and the version number isn't always
specified.
This patch was designed for the 1.0 ROM. If neither the headered nor the
unheadered patch works with your ROM, you may be using a 1.1 ROM. Find a 1.0
version, and try again.
One effect of this patch will be to expand your ROM's size to 32 Mb. It is
designed to be applied to an unaltered, non-expanded ROM. There is no need to
expand the ROM yourself before applying the patch. In fact, if you apply this
patch to a ROM that you have already expanded, and you have written your own
code or data to the expanded region, this patch will overwrite that data. So,
apply this patch first, before applying your own additional modifications.
4. IMPORTANT USAGE INFORMATION
===================
This modification is easy to use, more or less. Just apply the .ips patch to
an unaltered ROM, and then import your own sprites with a compatible editor
(FF3usME is fully compatible). HOWEVER, there are important caveats. If you
don't understand these issues, your custom sprites may appear glitched, and
you will not know why. So please, read carefully.
This could also be seen as a troubleshooting section. If your sprites are not
displaying their correct colors, read / re-read this section.
~~~ 4.1 ~~~
PC sprites are still limited to 12 colors for a given character. These
colors can now be any 12 of your choosing from the 16-color palette assigned
to the character. The chosen subset of colors can be different for each PC.
~~~~~~~~~~~
Elaboration:
To be as clear as possible, the original game only allows playable characters
to use the FIRST 12 entries of a palette. The entire set is usable on the
world map. NPCs who share palettes with PCs sometimes use the last 4 colors.
However, if a PC sprite uses those colors, it will not display correctly in
battle.
With this patch, a PC sprite is still limited to a set of 12 colors. The 12
colors can be any subset of the 16-color palette assigned to that PC. (Sorry,
you cannot mix-and-match across palettes.) The chosen colors no longer have to
be the first 12 colors of the palette. They can include the last four which
were previously unusable.
If two sprites use the same 16-color palette, they do not necessarily have to
use the same 12 colors from their common palette. Each PC sprite can use its
own subset.
You do not have to explicitly specify which 12 colors you want to use. Just
edit your sprite as if it were a 16-color sprite, but make sure you do not
actually use more than 12 colors.
~~ 4.1.1 ~~
In addition, certain palette colors are special, and must always be
considered "used", even if they are not actually used by any pixel
~~~~~~~~~~~
The special colors are those in palette indices 1, 2, 7, and 8. Index 1 is
transparent. 2 is the black / outline color. 7 and 8 are skin tones.
2, 7 and 8 are special because they change when the PC is subject to a status
effect. The outline (#2) is used for effects like vanish, protect and haste.
The skin tones (7 & 8) are used for effects like poison and zombie. It's
because of their special status that they cannot be toyed with or omitted from
the palette.
Even if a sprite does not use these colors (Like Shadow's sprite, which does
not have any visible skin) these palette indices will always be considered
"used" and will count toward the 12 color maximum.
Another way of thinking of this is: your palette subset must include indices
1, 2, 7 and 8, and can include up to 8 additional colors (out of 12 additional
colors in the 16-color palette).
You should also keep these special indices in mind when creating your own
custom sprites or palettes. Make sure you use them for their intended purpose
if you want your character to look right when, e.g., poisoned.
~~~ 4.2 ~~~
Graphics glitches may occur when you load an older save game after making
changes to your custom sprites. A simple in-game fix is provided.
~~~~~~~~~~~
When you are actively changing your custom sprites, you may encounter a
problem. If you save a game (or save a state), and then edit your ROM,
changing your character sprites, and then subsequently load the game which you
saved while using the old sprite data, your new sprites may not show up with
correct colors.
This won't occur once you've stopped modifying your sprites. It will only
happen if you alter the ROM and continue to use the existing save file. So, it
won't be an issue for players of your finished hack. But, it might be an
annoyance to you while you are developing and testing.
A fix is available in-game. If you're experiencing this problem, open the main
menu (the one that shows character portraits and has options for items,
skills, equip, and so on). Hold down the L and R buttons, and press SELECT.
This will clear a cache of data, which is responsible for the issue. If cached
data is found and cleared, you will hear a tone (the "healing" sound-effect).
The next time you enter battle, your new sprites will display correctly. You
may notice a short pause as the data is recalculated. That will only happen
the first time a sprite is used in battle after the cache is cleared, once for
each sprite.
If you want to get rid of the cache-clear feature when you distribute your
finished hack, so users can't clear the cache, you can use a hex editor to
disable/remove the code. See the "advanced users" section for information.
However, it is probably not necessary to do so. Even if your players do
trigger this by accident (or on purpose) nothing bad will happen. The only
side-effect will be a slight pause next time a sprite is loaded.
~~~ 4.3 ~~~
Battle palettes can be different from out-of-battle palettes, and you must
watch out for this, or your sprites may display in an unexpected way.
~~~~~~~~~~~
Battle palettes and out-of-battle palettes are stored in different locations
in the ROM, even though they mostly duplicate each other.
In a few cases, the last four colors for a particular battle palette are not
the same as the corresponding colors for the non-battle palette. The last four
battle palette colors are normally not ever used anyway, so the developers
presumably just didn't bother to keep them synchronized. However, with this
patch, they ARE used for the first time (if you make a custom sprite that uses
them).
I've taken the liberty of altering the battle palettes to match the out-of-
battle palettes. This tweak is a part of the IPS patch. Even so, you may
encounter this issue if you edit the palettes yourself, or if you patch the
game manually rather than applying the ips, or something else. So, if your
sprites look different in and out of battle, make sure this is not the issue.
~~ 4.3.1 ~~
There are other cases, not related to this patch, in which sprites may use
the "wrong" palette.
~~~~~~~~~~~
If you switch the palette number assigned to a PC, the switch may not
correctly happen under all circumstances. This is NOT caused by this patch. It
is a quirk present in the original game.
For instance, the wrong palette may be used on the world map, in shop menus,
on the save game screen, or in certain scenes in which the character is
considered an NPC.
These issues are fixable, although they can be awkward to fix. You should
check out the documents and message boards available at ff6hacking.com, and
other pages found in that site's link section.
Again, these issues have nothing to do with my patch. I'm mentioning them in
case someone THINKS they are caused by this patch.
5. IF YOU'RE CURIOUS
===================
Some additional information explaining the reasons for certain quirks and
restrictions, and some detail about exactly what this patch does / how it
works.
~~~ 5.1 ~~~
Why can I only use 12 colors?
~~~~~~~~~~~
The graphic engine works in a certain way:
SNES sprites normally have a 16-color palette per sprite. They can choose a
palette from a selection stored in palette memory. Palette memory holds up to
8 sprite palettes, each having its own 16 colors.
In FF6, on the world map, sprites use an entire 16-color palette, as per
normal. A sprite can contain any or all of the colors in its palette without
any problem.
In battle, however, character sprites "give away" a partition of their palette
to other, miscellaneous sprites, such as the hand cursor, damage digits, and
so on. PC sprites only use the first 12 colors, while the other sprites only
use the last 4. So, if you create a PC sprite that uses the last 4 colors,
those colors will show up as colors from the hand cursor or something else,
instead of how they're supposed to.
The developers did this to work around the SNES's limited palette memory. The
battle engine wants to display many different sprites, and each sprite needs
to be able to load its own independent palette. The only way to achieve this
is to allow some sprites to share a palette, with each using its own partition
of the 16 colors. It is necessary and actually kind of clever. But it has the
side-effect of reducing the colors available to PCs. That is why you can only
use the first 12 colors in the unpatched game.
This patch changes things. In order to use the formerly inaccessible colors,
graphic and palette data are now altered dynamically in memory whenever a PC
sprite is loaded for battle. If the sprite uses a color from the last 4
entries of the palette, that color is switched into one of the first 12
palette slots: the ones belonging to the PC sprite.
That is of course only possible if there is an unused slot within the first
12. You must omit a color to add one.
So, even with this patch, you are still limited to 12 colors, but they can be
any 12 of your choosing.
~~~ 5.2 ~~~
What is the cache, and why do I have to clear it when I edit my sprites?
~~~~~~~~~~~
In order to achieve its result, this patch dynamically alters sprite data in
memory. That takes a certain amount of time. In testing, there was an
associated "load time" / graphics processing time at the beginning of each
battle, which was annoying.
In order to reduce processing time, the algorithm was made to permanently save
some intermediary data, after calculating it just once for a given sprite.
The first time a particular character sprite is loaded for battle, there will
be a small pause as it is analyzed and modified to use its correct colors. The
next time the same sprite is loaded, the saved data will be re-loaded from the
cache. That will bypass a lot of calculation, and reduce the length of the
pause to something less noticeable.
The pre-calculated data is stored in SRAM. That is the same place your save
games reside. The data is in an unused part of the SRAM -- one which does not
belong to any of the three save games.
A positive effect of storing this data in SRAM is that it will persist across
saves/reloads. A negative side-effect is that the character sprite data will
effectively depend on both the ROM and SRAM. So it may not display correctly
if the ROM is edited but the SRAM is not. The workaround is to clear the
cache, meaning the data will simply be recalculated next time the sprite is
loaded.
6. FOR ADVANCED USERS
===================
If you are creating a sophisticated hack, you may want to know some specific
information about how this patch alters the ROM. You might be applying other
patches at the same time. Or you might have your own code or data. You might
want to know which bytes are altered by this patch, and you might want to
relocate this patch's code to prevent a conflict with another patch, or with
your own code or data.
If you aren't comfortable with hex editors and so on, this section will be too
advanced for you. If you don't know but would like to learn about these
things, google for terms like hex editor or assembler. If there's a question
google can't help you with, try a message board.
~~~ 6.1 ~~~
What bytes are altered?
~~~~~~~~~~~
The most substantial section of new code is inserted at $F0/0000 by default.
(In case you don't know, that is the CPU memory map address. The corresponding
byte in the actual ROM file, as seen in a hex editor, would be $300000, or
$300200 if your ROM has a header.)
The function there duplicates a function originally found at $C1/3D43. In
addition to doing the same work as the original function, it also does the
dynamic sprite editing, switching in the "extra" palette colors.
In order for the new code to be called, the original function in C1 must also
have its first few bytes overwritten, so it calls the new function in the new
bank and then returns. The bytes beginning at ROM address $013D43 (CPU address
C1/3D43) are overwritten with: 22 00 00 F0 60.
This is a long jump and assumes the default location of F0/0000. The middle
three bytes are the address of the new code, beginning with the least
significant byte. If you moved the new function to $F38000 (for instance), you
would change those bytes to: 22 00 80 F3 60.
HOWEVER: an important thing to know is that this new code in F0 cannot simply
be relocated by copy/paste. That is because it includes jumps and pointers
within itself that reference absolute memory addresses. If you move the
function from its original ROM location, it will load or jump to nonsense data
stored at the original location in F0.
If you want to relocate the code, you will have to reassemble it from the .asm
file I have provided. I have tried to make this as easy as possible. You only
have to change a couple of constants found near the top of the file. See below
for instructions on where to get the assembler, and how to assemble the code.
As an aside, if you want some free space in bank C1, you can overwrite the
original function in C1, which is replaced by the new function in F0. The
function begins at C1/3D43, which is where we inserted the long jump to the
new code. Following the five bytes which do the long jump and return, you may
overwrite the rest of the function with FF or other junk data, and add your
own new code or data there. The function ends at C1/3E4C.
Continuing on, there is also another, smaller code addition in bank C3. A
short piece of extra code is added at C3/F0A0 (ROM address 03F0A0). That is
the code that clears the SRAM data cache when you press the appropriate
combination of buttons while on the main menu.
We also change an existing function to jump to that new code. The three bytes
beginning at C3/1DA4 (ROM location 031DA4) are overwritten with: 20 A0 F0.
This, again, assumes the default location for the new function. A0 F0 are, of
course, the pointer to the function, with the least significant byte first.
If you want to disable the clear-cache feature, you can overwrite the bytes at
C3/1DA4 their original values, which are 20 48 35. Then the ROM will no longer
jump to the clear cache code. You can also get rid of the clear cache code after
you've done that.
Unlike the other new function in F0, this function in C3 can be freely
relocated within C3. Just copy/paste its bytes to another address, and change
the jump pointer. Do not move it outside of C3, however, or you will have to
make a long jump instead of a jump.
~~~ 6.2 ~~~
Reassembling the code
~~~~~~~~~~~
First: you can open the file expandedpalettes.asm in a text editor like
notepad.
If you just want to relocate the code, I've made this as easy as possible to
do. At the start of the file, there will be a bunch of explanatory comments,
and a couple of constants you can change, in order to specify the memory
location to which you want to relocate this function.
By default these read:
MY_DATA_BANK .EQU $F0
And:
MY_CODE_OFFSET .EQU $0000
If you would like to relocate the function to from F0/0000 to F1/1234, you
would change these to:
MY_DATA_BANK .EQU $F1
MY_CODE_OFFSET .EQU $1234
This is also all you need to do.
Feel free to read and modify the rest of the code if you wish. That would be
for a very advanced and very intereseted user, however.
So now, you'll want to use this .asm file to produce binary data. You can do
that with the assembler found at:
http://www.obelisk.demon.co.uk/dev65/index.html
This is the assembler I used. Other assemblers for the SNES architecture may
also work, but they may not, because they do not all use the same syntax. So,
you should use that one.
The assembler is java-based, so it should work on nearly any computer or OS,
although you may have to work harder if your computer is not Windows, because
the .bat files will not work.
Download and extract the file. Then move the file expandedpalettes.asm into
the same directory as the assembler, which should include the files 65xx.jar,
As65.bat and Lk65.bat.
Open a command prompt, and browse to that directory. You want to type the
following:
call As65 expandedpalettes.asm
That will make a file called expandedpalettes.obj, which is an intermediary
file between the asm text, and the binary data.
Then, type the following:
call Lk65 -code $00000-$1ffff -output expandedpalettes.bin -bin
expandedpalettes.obj
Alternately, instead of using the command line, you can paste those two lines
into a text file, save it with the extension .bat, and run it from the
assembler directory.
Anyway, this will produce a binary data file called expandedpalettes.bin. You
can open that file with a hex editor in order to get the data, and paste it
into your ROM.
The output .bin file may (or may not) start with a bunch of filler data, in
the form of EA over and over. The EA filler will be present if the code offset
you specified was not equal to $0000 (that is: if you asked to relocate the
code to somewhere other than the very start of a bank). Ignore those EA bytes.
They are a side-effect of a somewhat lazy and inelegant method I used to get
the pointers to point to the right locations.
Find the first value that is not EA. That will be the start of the code for
the function located by default at $F00000. If you changed the constants in
the asm file, the code found here will work when pasted to your chosen
location, instead of the default location of F0/0000 / 300000.
The function is about $500 long in hexadecimal-numbered bytes. It does not
take up the entire bin file. Following its end, there will be a few lines of
EA. Those EAs serve as a visual separator between this function and the next
function in the bin file. They are filler and don't need to be copied. When
you copy/paste this function into your ROM, DO NOT copy the EAs -- either the
ones before or after the function. Especially do not copy the ones before the
function. That will mess up your pointers.
Begin with the first non-EA value. The first three bytes of the function
should be: C9 FF D0. The function ends a little less than $500 later. The last
three bytes should be: 40 00 80. The ending is followed by 64 repetitions of
EA.
Overwrite the appropriate part of your ROM with the data from
expandedpalettes.bin. Overwrite the ROM beginning at the location you
specified when you modified the .asm file.
Don't forget to also change the long jump located at C1/3D43, so it points to
your new/relocated function.
Now, in expandedpalettes.bin, following the main function, and following the
64 EAs which serve as a separator, we have the binary data for the other added
function -- the one meant to be located in C3. It can be located in any free
space in C3. (The free space is located at the end of the bank, starting with
03F091, and is filled with the value FF.) You may, if you want, manually
copy/paste those bytes from the bin into the ROM. If you applied the IPS
patch, the function will already be in the ROM. Don't forget to update the
jump statement located at C3/1DA4 so it points to the correct location of the
new code.
The last few bytes of the C3 function should be B9 0E 60. These are followed
by a bunch of 00s. You do not need to copy the 00s.
That should do it. You've now manually patched the ROM with the new code at a
location of your choosing. Run it and give it a try.
If it does not work, troubleshooting suggestions:
Does your ROM have a header? If so, remember to add 200 when determining the
ROM file address to paste into.
Also, remember that the SNES CPU does NOT "know" about the header. That means
you should NOT add 200 when determining the SNES memory address.
Also, in case you forgot, the SNES memory address is equal to the ROM file
address +C0 (hexadecimal number). So, for instance, ROM address 315432 would
be SNES memory address F1/5432. That is assuming the ROM has no header.
When you pasted the bytes, make sure you overwrote the old data, rather than
inserting it, which would cause the ROM to grow in size. If the ROM is a few
bytes too big because you inserted extra data, or if existing code is shifted,
that will cause many problems.
Make sure you copied all the appropriate code, and only the appropriate code.
Make sure you did not copy the EAs.
Make sure you also inserted / updated the jump statements in C1 and C3 to
point to the addresses where you copied the new code.
That should do it.
Final Fantasy III (V1.0) (US).smc
With header
CRC32: d184d919
MD5: 4cdfc79b44cd6d532dc6631a5c762094
ALTERNATELY: Final Fantasy III (V1.0) (US).smc
Without header
CRC32: a27f1c7a
MD5: e986575b98300f721ce27c180264d890
SNES Cores
Release Date
Sep 12, 2014
11 years ago
Similar Games
 8.9Final Fantasy VI
 7.6Final Fantasy 5
 ~FINAL FANTASY 3
 ~Final Fantasy III
 7.4Final Fantasy: Mystic Quest
 7.7Final Fantasy V
 ~Final Fantasy III : A Complete Hack
 7.4Final Fantasy: Mystic Quest Reborn
Popular Super Nintendo Games
SNES Core Required
Final Fantasy III: Expanded Palettes Hack ROM
Download the Final Fantasy III: Expanded Palettes Hack ROM free and start playing in minutes on any top emulator—desktop, mobile, or web. Enjoy lightning-fast Final Fantasy III: Expanded Palettes Hack ROM downloads with full setup guides, cheats, and retro gaming tips so you can relive the classics today.


